Spring finally arrived, which means the ground is soft enough to dig and your outdoor boiler project can finally move forward after a long winter of planning. This complete guide shows you how to install insulated PEX pipe outdoor boiler systems correctly this season, from trenching to testing to firing up your first load.
Why Spring 2026 Is Your Best Window
Ground temperatures above 45°F make trenching dramatically easier than trying to dig through frozen soil or dealing with muddy fall conditions. Your mini excavator won’t struggle; the dirt moves cleanly, and you can actually see what you’re doing without fighting the weather. Plus, completing your installation now gives you all summer to work out any quirks before next heating season demands full performance.
Spring also brings better pricing on materials and equipment rentals, as everyone hasn’t hit peak outdoor project season yet. You’ll find mini excavators available without two-week waits, and contractors have time for consultations if you need professional guidance on tricky sections. Get this done in April or early May, and you’re set for years of efficient heating.
What You Need Before Breaking Ground
Call 811 at least two business days in advance of digging. This free service marks all underground utilities on your property so you don’t accidentally rupture a gas line or slice through electrical service. Some older properties may require private locates for wells or septic systems, which can cost around $150, but that’s a relatively inexpensive measure to avoid costly mistakes. Mark your intended trench path with spray paint once utilities are flagged.
PEX-A tubing with oxygen barrier protection is what you want for pressurized outdoor boiler systems. The oxygen barrier prevents corrosion inside your boiler’s cast iron components, which extends equipment life significantly. Pre-insulated systems like Heat Mizer come with supply and return lines already wrapped in high-density foam with waterproof outer jackets, eliminating the hassle of field insulating individual pipes.
Planning Your Trench Route
Walk the straightest possible path from your boiler location to each building you’re heating. Avoid running under driveways if possible, but if you must cross one, plan for deeper burial at least 4 feet down with PVC sleeve protection around the PEX. Trees are another consideration because roots can damage pipes over time, so route around major root systems when you can.
Measure your total run carefully and add 10 percent for slack and gentle curves. 90 degree elbows put stress on PEX and cause restriction to water flow so make sure you have wide turns. Most homes run 100 to 300 feet total, which manages a house and garage or shop without requiring pump boosters.
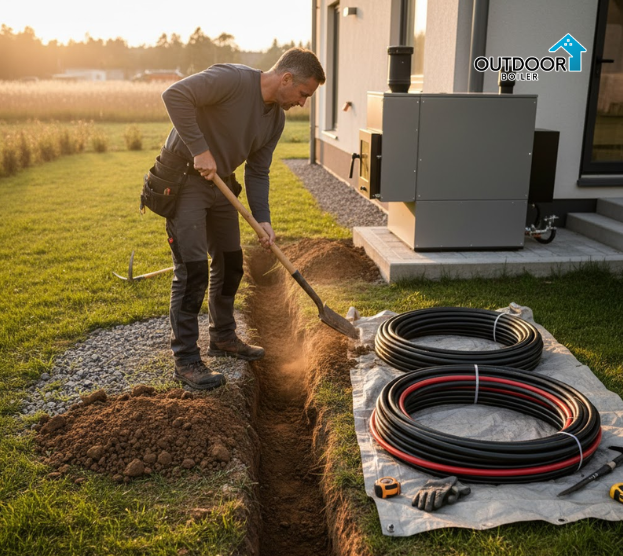
Digging Your Trench Right
Standard residential depth runs 18 to 24 inches in moderate climates, but northern states with deep frost lines need 36 to 48 inches minimum. Below frost line will prevent the ground from moving by freeze thaw cycles, twisting or breaking your pipes. Figure about $250 a day for mini excavator rental and most tasks can be completed in one to two days, depending on distance and soil conditions.
Dig a few inches deeper than the outside diameter of your pipe to make room for a sand bed underneath. This layer of sand is a cushion for the PEX and acts as a barrier from sharp stones, that might put holes in the insulation jacket over time. Maintain the width of your trench at 18 to 24 inches, providing space for you to work without removing unnecessary soil. If you are also running electrical service to the boiler, keep at least 6 inches of air between power lines and your PEX.
Laying Pipe Without Mistakes
Start at the building end and work back toward the boiler, unrolling pre insulated PEX slowly to prevent kinks or twists. Any sharp bends will restrict water flow and create stress points that can fail years down the road. For building entry through basement walls, core drill a 5 to 6 inch hole that accommodates the insulated pipe diameter plus clearance for sealing with hydronic cement.
Keep your runs as continuous as possible without underground fittings, which represent potential leak points you can’t easily access after backfilling. If you absolutely need a fitting underground, use only high quality expansion or crimp connections and test them thoroughly before covering. Most quality installations use a single continuous run from boiler to manifold with all connections happening at accessible endpoints.
Making Solid Connections
At the boiler end, transition from your insulated PEX to the water jacket connections using quality fittings rated for 200°F continuous operation. Install your aquastat controller to maintain water temperatures between 160 and 180°F during normal operation with a high limit cutoff around 220°F for safety. Add an air separator and fill valve at this location too, which makes system maintenance much easier.
Inside the building, your PEX runs into a manifold with zone valves for separate heating zones. Include an expansion tank as per system volume, usually, around 4-5 gallon for a residential application. Place your circulator pump on the cooler return side of system and increase efficiency, pumping less hot water. These parts cooperate to ensure heat is spread quickly through your heating zones.
Learn About EPA Standards for Outdoor Wood Heaters
Pressure Testing Before Backfill
This step prevents disasters. Close all valves and pressurize your system to 50 psi using air rather than water, which makes leak detection easier and prevents water damage if you find problems. Hold that pressure for 30 minutes while walking the entire trench looking for drops on your gauge or hissing sounds that indicate leaks.
If pressure holds steady for the full 30 minutes, you’re good to proceed with backfilling. Any pressure drop means finding and fixing the leak before covering anything up. Common culprits are improperly seated expansion fittings or crimps that didn’t compress fully. Fix them now because digging up a buried leak later costs time, money, and serious frustration.
Backfilling for Long Term Protection
Cover your tested pipe with 4 to 6 inches of clean sand first, which provides a protective cushion layer all around the insulation jacket. Then backfill with native soil in 6 inch lifts, tamping gently between layers to prevent future settling without compacting so hard you risk damaging the pipe. Some installers run bright colored warning tape 12 inches above the pipe as a reminder if anyone digs there years later.
Leave the soil slightly mounded along the trench line because it will settle over the next few months as rain compacts everything naturally. This prevents developing a low spot that collects water and creates a muddy mess. Reseed or sod the disturbed area once backfilling is complete so it blends back into your yard.
System Startup and Testing
Fill your system slowly through the fill valve, starting with just water to flush any construction debris through. Once water runs clear from your highest bleed point, drain it and refill with a 25 percent propylene glycol mixture for freeze protection. This non toxic antifreeze keeps your system safe down to around negative 20°F even if circulation stops temporarily.
Bleed air from every high point in the system systematically, working from the highest zones down to the lowest. Air pockets kill circulation and create hot spots that can damage components. Fire your outside wood stove to operating temperature around 160°F and verify that heat reaches all zones properly. Check your temperature drop across long pipe runs, which should be less than 2 degrees per 100 feet with quality insulated PEX.
Dealing With Common Installation Issues
Kinked pipe during unrolling needs straightening immediately before it sets into that shape. Don’t try pulling hard on kinked sections because you’ll just make it worse. Instead, gently work the kink out by hand manipulation while the pipe is still somewhat flexible. If insulation jacket shows tears or punctures from rocks or tools, replace that entire section rather than trying to patch it, because moisture infiltration destroys insulation value quickly.
Airlocks at high points cause circulation problems that feel like your system isn’t heating properly. Install automatic air vents at these locations or make sure you have manual bleed valves you can access. Undersized pumps show up as poor heat delivery to distant zones, which means recalculating your GPM requirements and upgrading to a larger circulator if needed.
What This Project Actually Costs
Budget around $2,500 to $3,000 for a typical 200 foot run including quality Heat Mizer insulated PEX, all fittings and connections, manifold components, pump and controls, sand for bedding, and mini excavator rental for two days. Professional installation typically runs two to three times that amount, so capable DIYers save substantial money handling this project themselves.
The investment pays back through reduced fuel consumption. Quality insulated PEX delivers 35 to 40 percent better heat retention compared to bare pipe or poorly insulated alternatives, which translates to burning one to two fewer cords of wood per heating season. At $300 per cord, you recover installation costs within two to three years through fuel savings alone.
Your Installation Questions Answered
What’s the absolute minimum burial depth for insulated PEX? Frost line depth for your region, typically 18 to 48 inches depending on location and climate.
Can you install PEX in frozen ground? Technically yes but it’s miserable work, equipment struggles, and you risk damaging pipe trying to force it into hard soil.
Do you really need the sand bedding layer? Yes, it protects your expensive insulated pipe from rock punctures that cause leaks and insulation damage.
How do you prevent thermal expansion problems? Leave slight slack at building entry points so pipe can expand and contract naturally with temperature changes.
Should all fittings be accessible or can some go underground? Avoid underground fittings whenever possible, but if necessary use only premium expansion fittings and test exhaustively.
What size PEX for a 250 foot run to a 2500 square foot house? One inch diameter handles most residential loads at that distance without needing pump boosters.
Get Your Installation Right This Spring
Spring 2026 offers ideal conditions for completing your outdoor boiler piping project before the next heating season arrives. Soft ground, available equipment, and comfortable working temperatures make this the smart time to tackle trenching and installation. Quality materials like Heat Mizer insulated PEX, combined with proper installation techniques, deliver decades of reliable service with minimal maintenance.
Ready to order your materials and get started? Visit OutdoorBoiler.com to browse complete Heat Mizer systems, order exact lengths for your specific installation, and schedule a free design consultation. Their technical team helps you avoid common sizing mistakes and ensures you have every component needed before you start digging. Spring discounts on select items make premium quality more affordable right now.
Also Read: UploadArticle.com Movies Free: UploadArticle.com
Alex Morgan is a passionate writer delivers accurate and well-researched content on celebrity net worth, age, biography, and career insights.